my recent reads..

Atomic Accidents: A History of Nuclear Meltdowns and Disasters; From the Ozark Mountains to Fukushima
Power Sources and Supplies: World Class Designs
Red Storm Rising
Locked On
Analog Circuits Cookbook
The Teeth Of The Tiger
Sharpe's Gold
Without Remorse
Practical Oscillator Handbook
Red Rabbit
Showing posts with label SCM. Show all posts

Thursday, August 13, 2009

Rails dev pattern: collaborate on github, deploy to heroku

Heroku is an awesome no-fuss hosting service for rails applications (I think I've raved about it enough).

It works great for solo development. But what if you want a large team work on the app, while limiting production deployment privileges? Or if you want the application to run as an open source project?

Since git is core infrastructure for heroku, it actually makes setting up distributed source control trivial, like in the diagram:
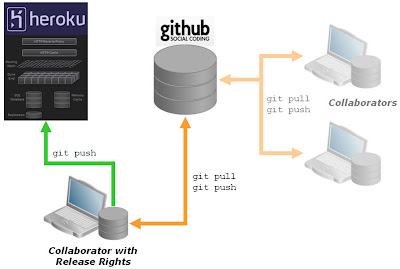

Here's a simple pattern for setting up this way. It may fall into the special category of "the bleeding obvious" if you are an experienced git user. But many of us aren't;-)

First, I'm assuming you have a rails application in a local git repository to start with. Like this:
$ rails test
$ cd test
$ git init
$ git add .
$ git commit -m "initial check-in"

Next, you want to create a new, empty repository on github. Github will give you a clone URL for the new repo, like
"git@github.com:mygitname/test.git".

Now we can add the github repo as a new remote location, allowing us to push/pull from github. I'm going to name the destination "github":
$ git remote add github git@github.com:mygitname/test.git
$ git push github master
Enter passphrase for key '/home/myhome/Security/ssh/id_rsa':
Counting objects: 3, done.
Writing objects: 100% (3/3), 209 bytes, done.
Total 3 (delta 0), reused 0 (delta 0)
To git@github.com:mygitname/test.git
* [new branch] master -> master

At this point, you are setup to work locally and also collaborate with other's via github. If you have a paid account on github, you can make this a private/secure collaboration, otherwise it will be open to all.

Next, we want to add the application to heroku. I'm assuming you are already registered on heroku and have the heroku gem setup. Creating the heroku app is a one-liner:
$ heroku create test
Created http://test.heroku.com/ | git@heroku.com:test.git
Git remote heroku added
$

You can see that this has added a new remote called "heroku", to which I can now push my app:
$ git push heroku master
Enter passphrase for key '/home/myhome/Security/ssh/id_rsa':
Counting objects: 29, done.
Delta compression using up to 2 threads.
Compressing objects: 100% (17/17), done.
Writing objects: 100% (17/17), 2.17 KiB, done.
Total 17 (delta 12), reused 0 (delta 0)

-----> Heroku receiving push
-----> Rails app detected
Compiled slug size is 208K
-----> Launching....... done
http://test.heroku.com deployed to Heroku

To git@heroku.com:test.git
4429990..4975a77 master -> master


So we are done! I can push/pull from the remote "github" to update the master source collection, and I can push/pull to the remote "heroku" to control what is deployed in production.

Sweet!

PS: Once you are comfortable with this, you might want to get a bit more sophisticated with branching between environments. Thomas Balthazar's "Deploying multiple environments on Heroku (while still hosting code on Github)" is a good post to help.

Tuesday, July 29, 2008

Heroku - Ruby in the Sky with Diamonds

I've been using Heroku since I heard about it on the Ruby on Rails podcast. It offers a hosted Rails development environment (all web-based), with instant deployment ... essentially you are running your dev, test and production environments 'in the cloud'. Heroku themselves use Amazon S3 I think.

It's worth checking out, even if you are not specifically interested in rails. A great example of how to operate 'up in the clouds'.

A couple of key things I've learned/noted in working with heroku..

Disabling the heroku toolbar


You probably don't want the heroku toolbar appearing for public users of your application (and I found it had some issues with IE). Disabling the toolbar is done by creating a file config/heroku.yml:
toolbar_collaborators: true
toolbar_public: false
request_timeout: 10

(picked this tip up from the mailing list)

Running with Rails 2.1


Rails 2.0.2 is the default, and 2.1 support took a while to arrive. It's here now. Simply update your config/environment.rb file to specify..
RAILS_GEM_VERSION = '2.1'

Distributed Version Control


Version control using git is rolled into heroku. And if you want to develop locally, there's a heroku gem that simplifies setting up your local clone. Once git and the heroku gem are installed, a typical session goes like this:
heroku create myapp
heroku clone myapp
cd myapp
ruby script/server
[..work locally for a while..]
git add .
git commit -m "some changes made locally"
git push
[..work on the server for a while and commit..]
git pull


Postscript Aug-09: heroku have since split their services in two: herokugarden.com, which includes the online, web-based editor, and heroku.com which is intended for high-performance production deployment (with no online editing)

Thursday, December 27, 2007

Migrating to a Virtual CVS Host

Seasons greetings to all! Of course, a few days off means time for some of those special projects that have been waiting in the wings;-)

I run a cvs repository for my personal use at home (migrating to subversion is a project for another xmas break). There are two stupid mistakes in the setup I've wanted to fix for a long time.
  1. It is running on the main machine I use for testing and development, which can lead to some tricky catch-22 situations. Duh!
  2. I've always used the servername to access the repository, which makes relocation a pain. This seems to be a problem common to the many development shops I have seen. Gold stars for actually using source control, but brickbats for not thinking of using a virtual host name before finding yourselves tied to a specific host!

The Relocation


Actually, by moving to a new server I mean old laptop .. it is easy to write-off a 256Mb 600MHz machine these days, but they really do make decent "network utility" servers! Running Linux of course. Ideal for just sitting in the corner and running your crucial network services day in, day out. Like cvs.

Since I was migrating the cvs repository from another Linux machine, the move was a piece of cake. The following notes assume Red Hat (or Oracle Linux), which is what I am running. It also assumes the cvs repository is at /cvsroot and the cvs user account is called cvs (just substitute your actual details where approriate).

CVS Setup - New Server
Most Linux distributions will already have the cvs server installed (but not configured or running). Since I'm on Red Hat, I can check for the cvs package using rpm:
$ rpm -qa | grep cvs
cvs-1.11.2-27

If you can't find the server package, download and install as appropirate for your distro.

Setting up the CVS Service
Create a new cvs user and group to own the repository.
[root@new server]# /usr/sbin/groupadd cvs
[root@new server]# /usr/sbin/useradd -g cvs cvs
[root@new server]# passwd cvs

Check that the service name is listed in /etc/services
$ grep cvspserver /etc/services
cvspserver 2401/tcp #cvs pserver process

To get the cvs server under xinetd control, create /etc/xinetd.d/cvspserver:
service cvspserver
{
socket_type = stream
protocol = tcp
wait = no
user = root
passenv = PATH
server = /usr/bin/cvs
server_args = --allow-root=/cvsroot -f pserver
}


Move the Repository Files
Normally at this point you would initialise a new repository if you are setting up a server from scratch (cvs -d /cvsroot init). However in this case I'm moving the repository files from the old to the new server. For me, this meant tar/gzip of the /cvsroot, ftp the archive to the new machine, and unzip to re-create /cvsroot.
[root@old server]# tar -zcvf cvsroot.tar.gz /cvsroot
[root@new server]# cd /
[root@new server]# ftp {file from old server}
[root@new server]# tar -zxvf cvsroot.tar.gz


Starting the Server
[root@new server]# /etc/init.d/xinetd restart
Voila!

Switching to a Virtual Hostname


OK, now we get to the main point of the post - using cvs with a "virtual hostname". I mean of course using a name that belongs to the cvs service rather than any particular server, which will make future relocations to new servers a breeze if it becomes necessary.

So where I used to access "server1.mydomain.com", I will now use "cvs.mydomain.com". These names can be resolved by DNS or hosts file. They could actually map to different IPs (i.e. use virtual IP address also), but in my case I have just setup "cvs.mydomain.com" as an alias for my new server's IP address.

To preconfigure the cvs environment for Linux users I add the following to /etc/profile:
export EDITOR=/bin/vi
export CVSROOT=:pserver:$USER@cvs.mydomain.com:/cvsroot


Migrating CVS Clients
Now what about all the cvs "clients"? Strict protocol would suggest you should make sure everything is checked in before the server move, and check out a fresh copy from the new server when it is ready. This is not really a nice way to go for at least two reasons:
  1. You'll probably miss something that needs checking in
  2. If you have directories with a mix of cvs controlled/non-controlled files you have an interesting mix-and-match problem to get everything back in sync
Fortunately there are some tricks you can employ to do an "in-place" migration of modules checked out on the client. Basically we just need to update the CVS/Root files with the details of the new server.

Here's a quick perl recipe for updating all of the CVS/Root files under the current directory in Linux:
perl -i.orig -pe "s/myacct\@server1.mydomain.com/mynewacct\@cvs.mydomain.com/g;" $(find . -name Root)

On Windows, you can use the extended FOR syntax to descend the directory tree:
for /R %r in (Root?) do perl -i.orig -pe "s/myacct\@server1.mydomain.com/mynewacct\@cvs.mydomain.com/g;" %r

These perl one-liners (-e) loop line-by-line (-p) through the file, modifying it in-place while also creating a backup file with the .orig suffix (-i.orig). Each line of the file is evaluated with the global search and replace regular expression (s///g).